Quickstart
If you already know Rust, and you have Rust and Cargo installed already, you can immediately get started by performing the following steps:
- (optional) Create a new Rust project
1
2
 cargo new --bin <YOUR-PROJECT-NAME>
 cd <YOUR-PROJECT-NAME>
- Add turtle as a dependency in
Cargo.toml1 2 3 4 5 6
[dependencies] turtle = "1.0.0-rc.3" # Compile turtle and other dependencies with optimizations [profile.dev.package."*"] opt-level = 3
- Replace the contents of
src/main.rswith the following:1 2 3 4 5 6 7 8 9 10 11 12
use turtle::Turtle; fn main() { let mut turtle = Turtle::new(); for _ in 0..360 { // Move forward three steps turtle.forward(3.0); // Rotate to the right (clockwise) by 1 degree turtle.right(1.0); } }
- Run the code with
cargo run. You should see a window pop up and a circle being drawn.
If the instructions above made sense to you and worked, you can move on to the next part of this guide. The rest of this page explains everything in much more detail.
Installing Rust #
Note: If you already have a recent version of Rust and Cargo installed, you can skip this section.
- Go to rustup.rs.
- Follow the instructions on that page to install Rust
- Open your terminal or command prompt, and check that you have the right
version with the following command:
1 2
$ rustc -V rustc 1.38.0 (625451e37 2019-09-23)
Your version should be greater than or equal to the one shown on this page.
Starting a New Rust Project #
Note: If you already have a Rust project created, you can skip this section. However, if you’re new to Rust, you may want to read this anyway.
Run the following commands in your terminal or command prompt:
1
2
$ cargo new --bin <YOUR-PROJECT-NAME>
$ cd <YOUR-PROJECT-NAME>
You should choose the name you want to use for this project and write it instead
of <YOUR-PROJECT-NAME> in these commands and any that follow. The first
command will create a new directory with the name <YOUR-PROJECT-NAME>. Inside
that directory will be everything you need to start writing Rust. The second
command will enter that directory so you can run the remaining commands on this
page.
The <YOUR-PROJECT-NAME> directory should look like the following:
1
2
3
4
<YOUR-PROJECT-NAME>
├── Cargo.toml
└── src
└── main.rs
You will write Rust code in .rs files in the src/ directory. The
Cargo.toml file is a configuration file for the Rust build system. The build
system, known as Cargo, makes it easy to add libraries like Turtle to your
project.
You can build and run your entire project with just a single command:
1
$ cargo run
This should produce something similar to the following output:
1
2
3
4
Compiling <YOUR-PROJECT-NAME> v0.1.0
Finished dev [unoptimized + debuginfo] target(s) in 0.38 secs
Running `target/debug/<YOUR-PROJECT-NAME>`
Hello, world!
Your project directory will now look something like the following:
1
2
3
4
5
6
7
<YOUR-PROJECT-NAME>
├── Cargo.lock
├── Cargo.toml
└── src
└── main.rs
└── target
└── ...several directories and files...
The new Cargo.lock file will ensure that any dependencies you add (see the
next section) will remain the same regardless of how many times you build so
that your build is reproducible on any computer. The target/ directory
contains the files generated by Cargo during the build.
The cargo run command will be enough to compile and run the Rust applications
you make with this crate. Any time we ask you to run your project, this is the
command you should use.
Adding Turtle as a Dependency #
In Rust, we share pieces of code by packing them up into “crates”. We call them crates because our packaging and build system is named Cargo. You may see the same concept referred to as a “library” or “package” in other programming languages. The Turtle crate gives you the ability to create animated pictures. There are many other crates available on crates.io that you can use in your application in addition to this one.
When you add a crate to your project, it is known as a “dependency” of your
project because your project depends on it in order to run. Cargo will
automatically download and build any dependencies that you add to your project
when you run a command like cargo run.
In this section, we will tell Cargo that we want to use the Turtle crate in our project. Cargo will then download the crate for us and build it without us having to take any extra steps.
To start, find the Cargo.toml file in the top-level directory of your Rust
project. Add the following to Cargo.toml:
1
2
[dependencies]
turtle = "1.0.0-rc.3"
The dependencies section may already exist in Cargo.toml. Make sure you don’t add it twice!
Then, add the following to the top of src/main.rs:
1
use turtle::Turtle;
The line that starts with fn main() declares a “function” called main. A
function is a group of lines of code that we want the computer to run. The
main function is special because that is the first “block” of code that the
computer will run. The contents of the function between the two curly braces
{...} is known as the “body” of the function.
Replace the body of the function so that the entire main function looks as follows:
1
2
3
4
5
6
7
8
9
10
fn main() {
let mut turtle = Turtle::new();
for _ in 0..360 {
// Move forward three steps
turtle.forward(3.0);
// Rotate to the right (clockwise) by 1 degree
turtle.right(1.0);
}
}
When you’re finished, src/main.rs should look as follows:
1
2
3
4
5
6
7
8
9
10
11
12
 use turtle::Turtle;

 fn main() {
     let mut turtle = Turtle::new();

     for _ in 0..360 {
         // Move forward three steps
         turtle.forward(3.0);
         // Rotate to the right (clockwise) by 1 degree
         turtle.right(1.0);
     }
 }
To run this code, run cargo run as you did above. You must be in the same
directory as your Cargo.toml file in order to run that command.
This time, you’ll see Cargo downloading and compiling the Turtle crate, as well as any other crates that the Turtle crate depends on. Cargo will build all of these for your operating system automatically without you having to take any additional steps. Once it is done, it will run your code. This process may take a few minutes the first time, but should be very fast from then on.
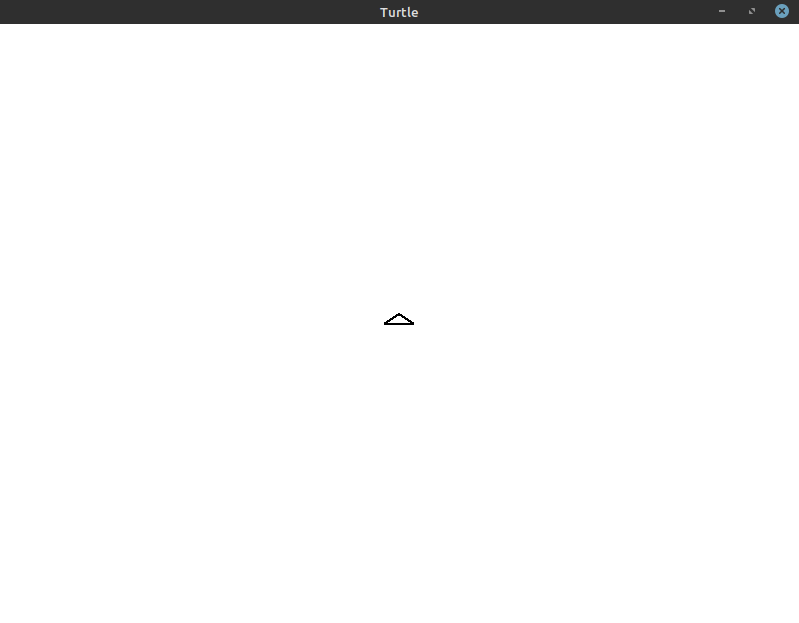
Once Cargo has built and run your code, you should see a window pop up and produce the following:
You just wrote some Rust code and drew your first picture with the Turtle crate! You’re now ready to go on to the next lessons and learn about this code and how you can create even more advanced drawings!