Basic Movement
In Overview, we introduced the forward and right methods to move and
rotate the turtle. If you attempted the exercises at the bottom of that lesson,
you saw that you can use these methods to go backwards and turn left as well.
This is handy, but it’s often more convenient to be able to go left or backwards
directly rather than having to pass a negative value to forward or
right.
For that reason, the Turtle struct provides the following four methods for
basic movement:
forward- Moves the turtle forward by the given amountbackward- Moves the turtle backward by the given amountleft- Rotates the turtle to the left (counterclockwise) by the given amountright- Rotates the turtle to the right (clockwise) by the given amount
These methods give you full control over the turtle’s movements and allow you to go anywhere you want within the window.
The key thing to remember about all of these methods is that they always act
relative to the current position and orientation of the turtle. That means
that if the turtle is pointing to the right, the forward method will move to
the right. Similarly, the left and right methods will rotate the turtle
towards its left side or towrads its right side, respectively.
Drawing a Triangle #
Let’s practice using some of these movement commands by drawing a triangle. It’s always a good idea to have a picture in your head (or on a piece of paper) so you know what you’re aiming to draw. This is the image we’re trying to create:

Think about the instructions you would give to the turtle to draw this picture. To start, you know from the Overview that the turtle starts in the center of the screen facing the top of the screen. If we move forward from that point, we’ll draw the leftmost line in the triangle shown above.
1
2
3
4
5
6
7
8
use turtle::Turtle;

fn main() {
    let mut turtle = Turtle::new();

    // This draws the leftmost line in the triangle
    turtle.forward(100.0);
}
From there, we need to turn. There are a number of different methods you can use to figure out the angle you need to rotate by. For example, you could guess a number (e.g. 60°) and see what happens. Another option is to use some geometry to try and figure it out. For instance, you could use the fact that a circle has 360° and the fact that the angles inside a triangle add up to 180° to come to a solution. We’re drawing an equilateral triangle, so all three angles inside of it must be equal to 180°/3 = 60°.

No matter what method you choose, the most important thing to remember is that the turtle always moves relative to its current position. That means that even though we eventually want the angle between the line we drew and the next line to be 60°, we actually need to rotate 120° in order to get the turtle facing the right way. The reason for this is because when we start turning, the turtle is currently facing the top of the screen.
1
2
3
4
5
6
7
8
9
10
use turtle::Turtle;

fn main() {
    let mut turtle = Turtle::new();

    // This draws two sides of the triangle
    turtle.forward(100.0);
    turtle.right(120.0);
    turtle.forward(100.0);
}
In this program, we move forward, rotate 120° to the right, and then move forward again. This gets us two sides of our triangle.
For the third side, we’ll need to do something very similar to what we did for the first two. Just like before, let’s rotate the turtle and then move forward some more.
1
2
3
4
5
6
7
8
9
10
11
12
use turtle::Turtle;

fn main() {
    let mut turtle = Turtle::new();

    // This draws a full triangle
    turtle.forward(100.0);
    turtle.right(120.0);
    turtle.forward(100.0);
    turtle.right(120.0);
    turtle.forward(100.0);
}
If you imagine these steps in your head, or if you just run the program, you’ll see the turtle draw a complete triangle that looks like the one below.
That’s it! With these 5 instructions, we’ve gone from a blank canvas to a full equilateral triangle! We’ll now try to make this image more interesting. Before we get to that though, let’s clean up our code a little bit.
Avoiding Duplication #
You may have noticed that the code above is pretty repetitive. We do the same thing over and over again almost three times. Let’s make this repetition even more explicit by adding a third and final turn to the program we had above:
1
2
3
4
5
6
7
8
9
10
11
12
13
14
use turtle::Turtle;

fn main() {
    let mut turtle = Turtle::new();

    turtle.forward(100.0);
    turtle.right(120.0);

    turtle.forward(100.0);
    turtle.right(120.0);

    turtle.forward(100.0);
    turtle.right(120.0);
}
Rust, like most programming languages, has a construct called a loop to help us
deal with this kind of repetition. Here’s what the code looks like using a for
loop to draw all three of the triangle’s sides.
1
2
3
4
5
6
7
8
9
10
use turtle::Turtle;

fn main() {
    let mut turtle = Turtle::new();

    for _ in 0..3 {
        turtle.forward(100.0);
        turtle.right(120.0);
    }
}
This is much shorter! It also makes our intention clearer because you can see that the loop repeats that code three times. That makes it easier to tell that this will draw exactly three lines to form our triangle.

Do you see the difference between this image and the one we produced before? The
extra call to right that we added at the end changes the current orientation
of the turtle at the end of our program. This may seem like a small detail, and
in this case it is, but don’t forget that all of the turtle’s movements are
relative to the current position and orientation of the turtle. We have to be
careful when we add extra movements like this because it could throw off the
rest of our program. Luckily, in this case, the program ends immediately after
that final rotation.
Now we will extend our program to draw a more interesting image.
Drawing Three Triangles #
How would you change the code to draw three triangles instead of just one? Well, based on what we did in the last section, you may be tempted to add an extra loop around the loop that draws our triangle. This should repeat the code three times and draw three triangles, right?
1
2
3
4
5
6
7
8
9
10
11
12
13
use turtle::Turtle;

fn main() {
    let mut turtle = Turtle::new();

    // Draw three triangles by repeating the triangle code three times
    for _ in 0..3 {
        for _ in 0..3 {
            turtle.forward(100.0);
            turtle.right(120.0);
        }
    }
}
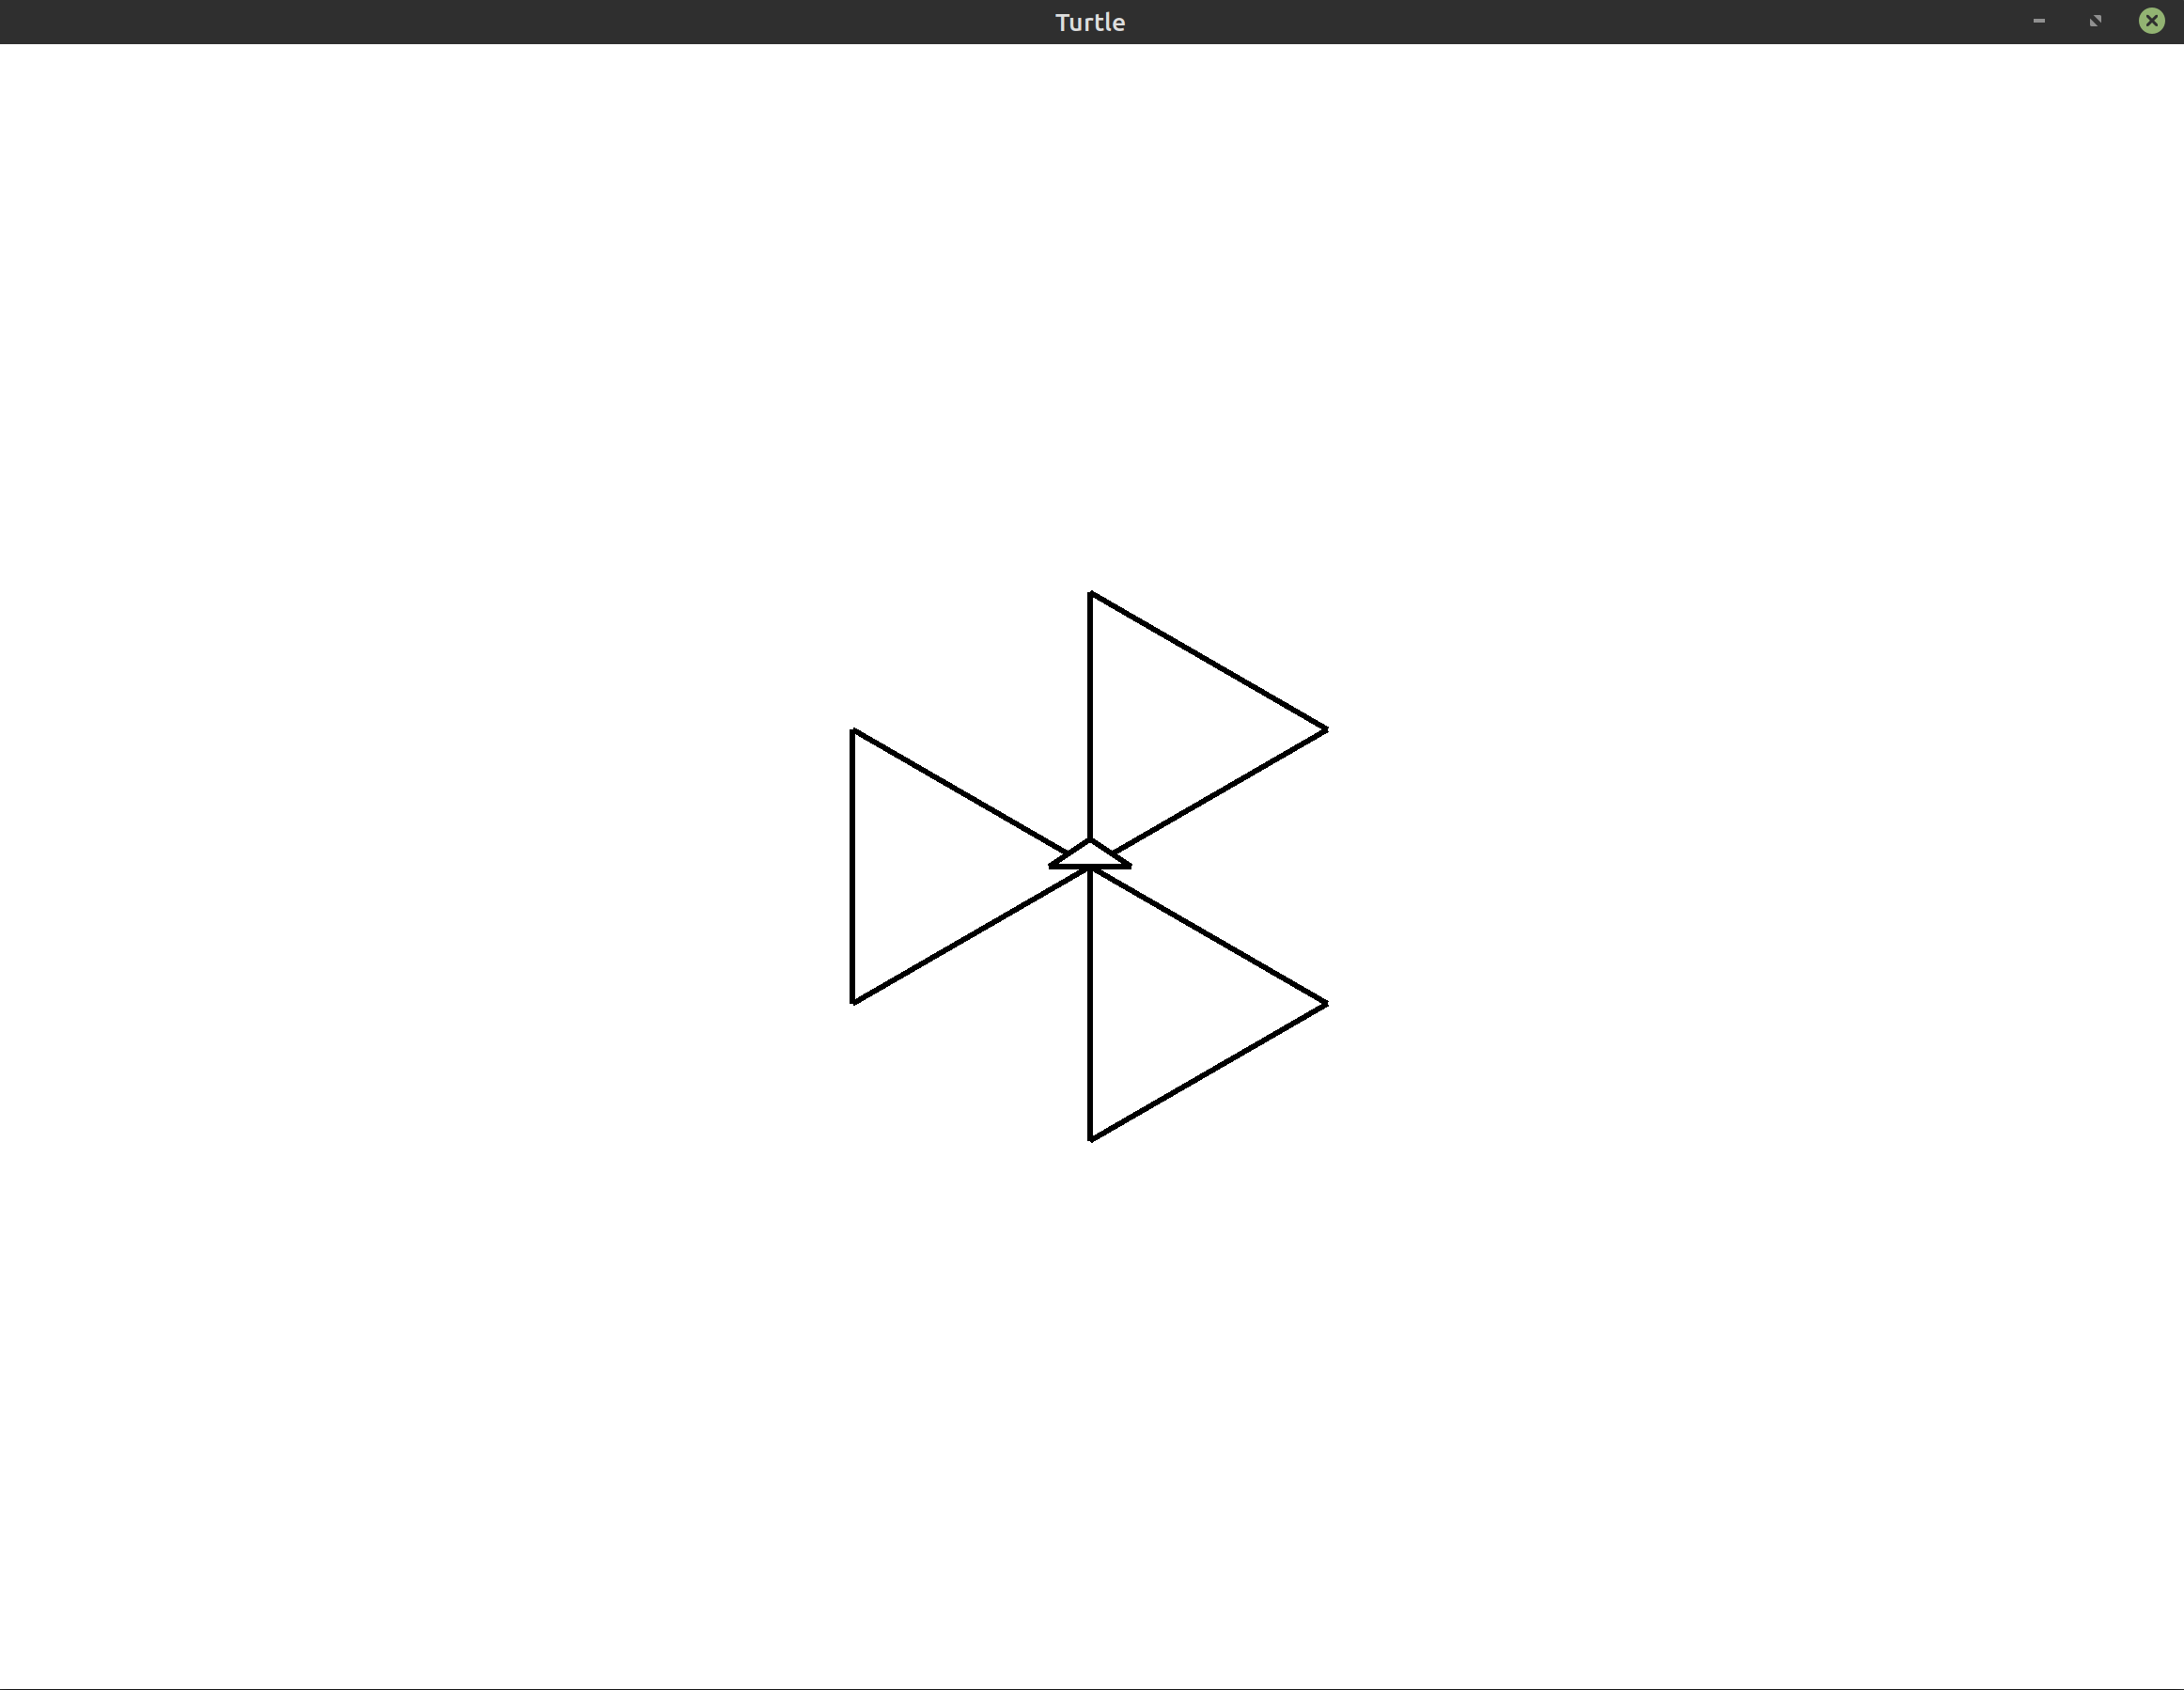
Let’s see what happens with this code:

This looks the same as what we had before! If you actually run this code, you’ll see that the resulting animation is actually not exactly the same as the previous triangle. If you watch this program run, the problem becomes immediately clear. It’s not that we’re only drawing one triangle, it’s that we’ve accidentally written a program that draws the same triangle over itself three times!
To fix this, let’s take advantage of the left method we discussed at the
start of this lesson. After we draw the first triangle, instead of continuing
to draw over the same spot, we’ll rotate the turtle so it starts drawing the
second triangle somewhere else.
1
2
3
4
5
6
7
8
9
10
11
12
13
14
use turtle::Turtle;
fn main() {
let mut turtle = Turtle::new();
for _ in 0..3 {
for _ in 0..3 {
turtle.forward(100.0);
turtle.right(120.0);
}
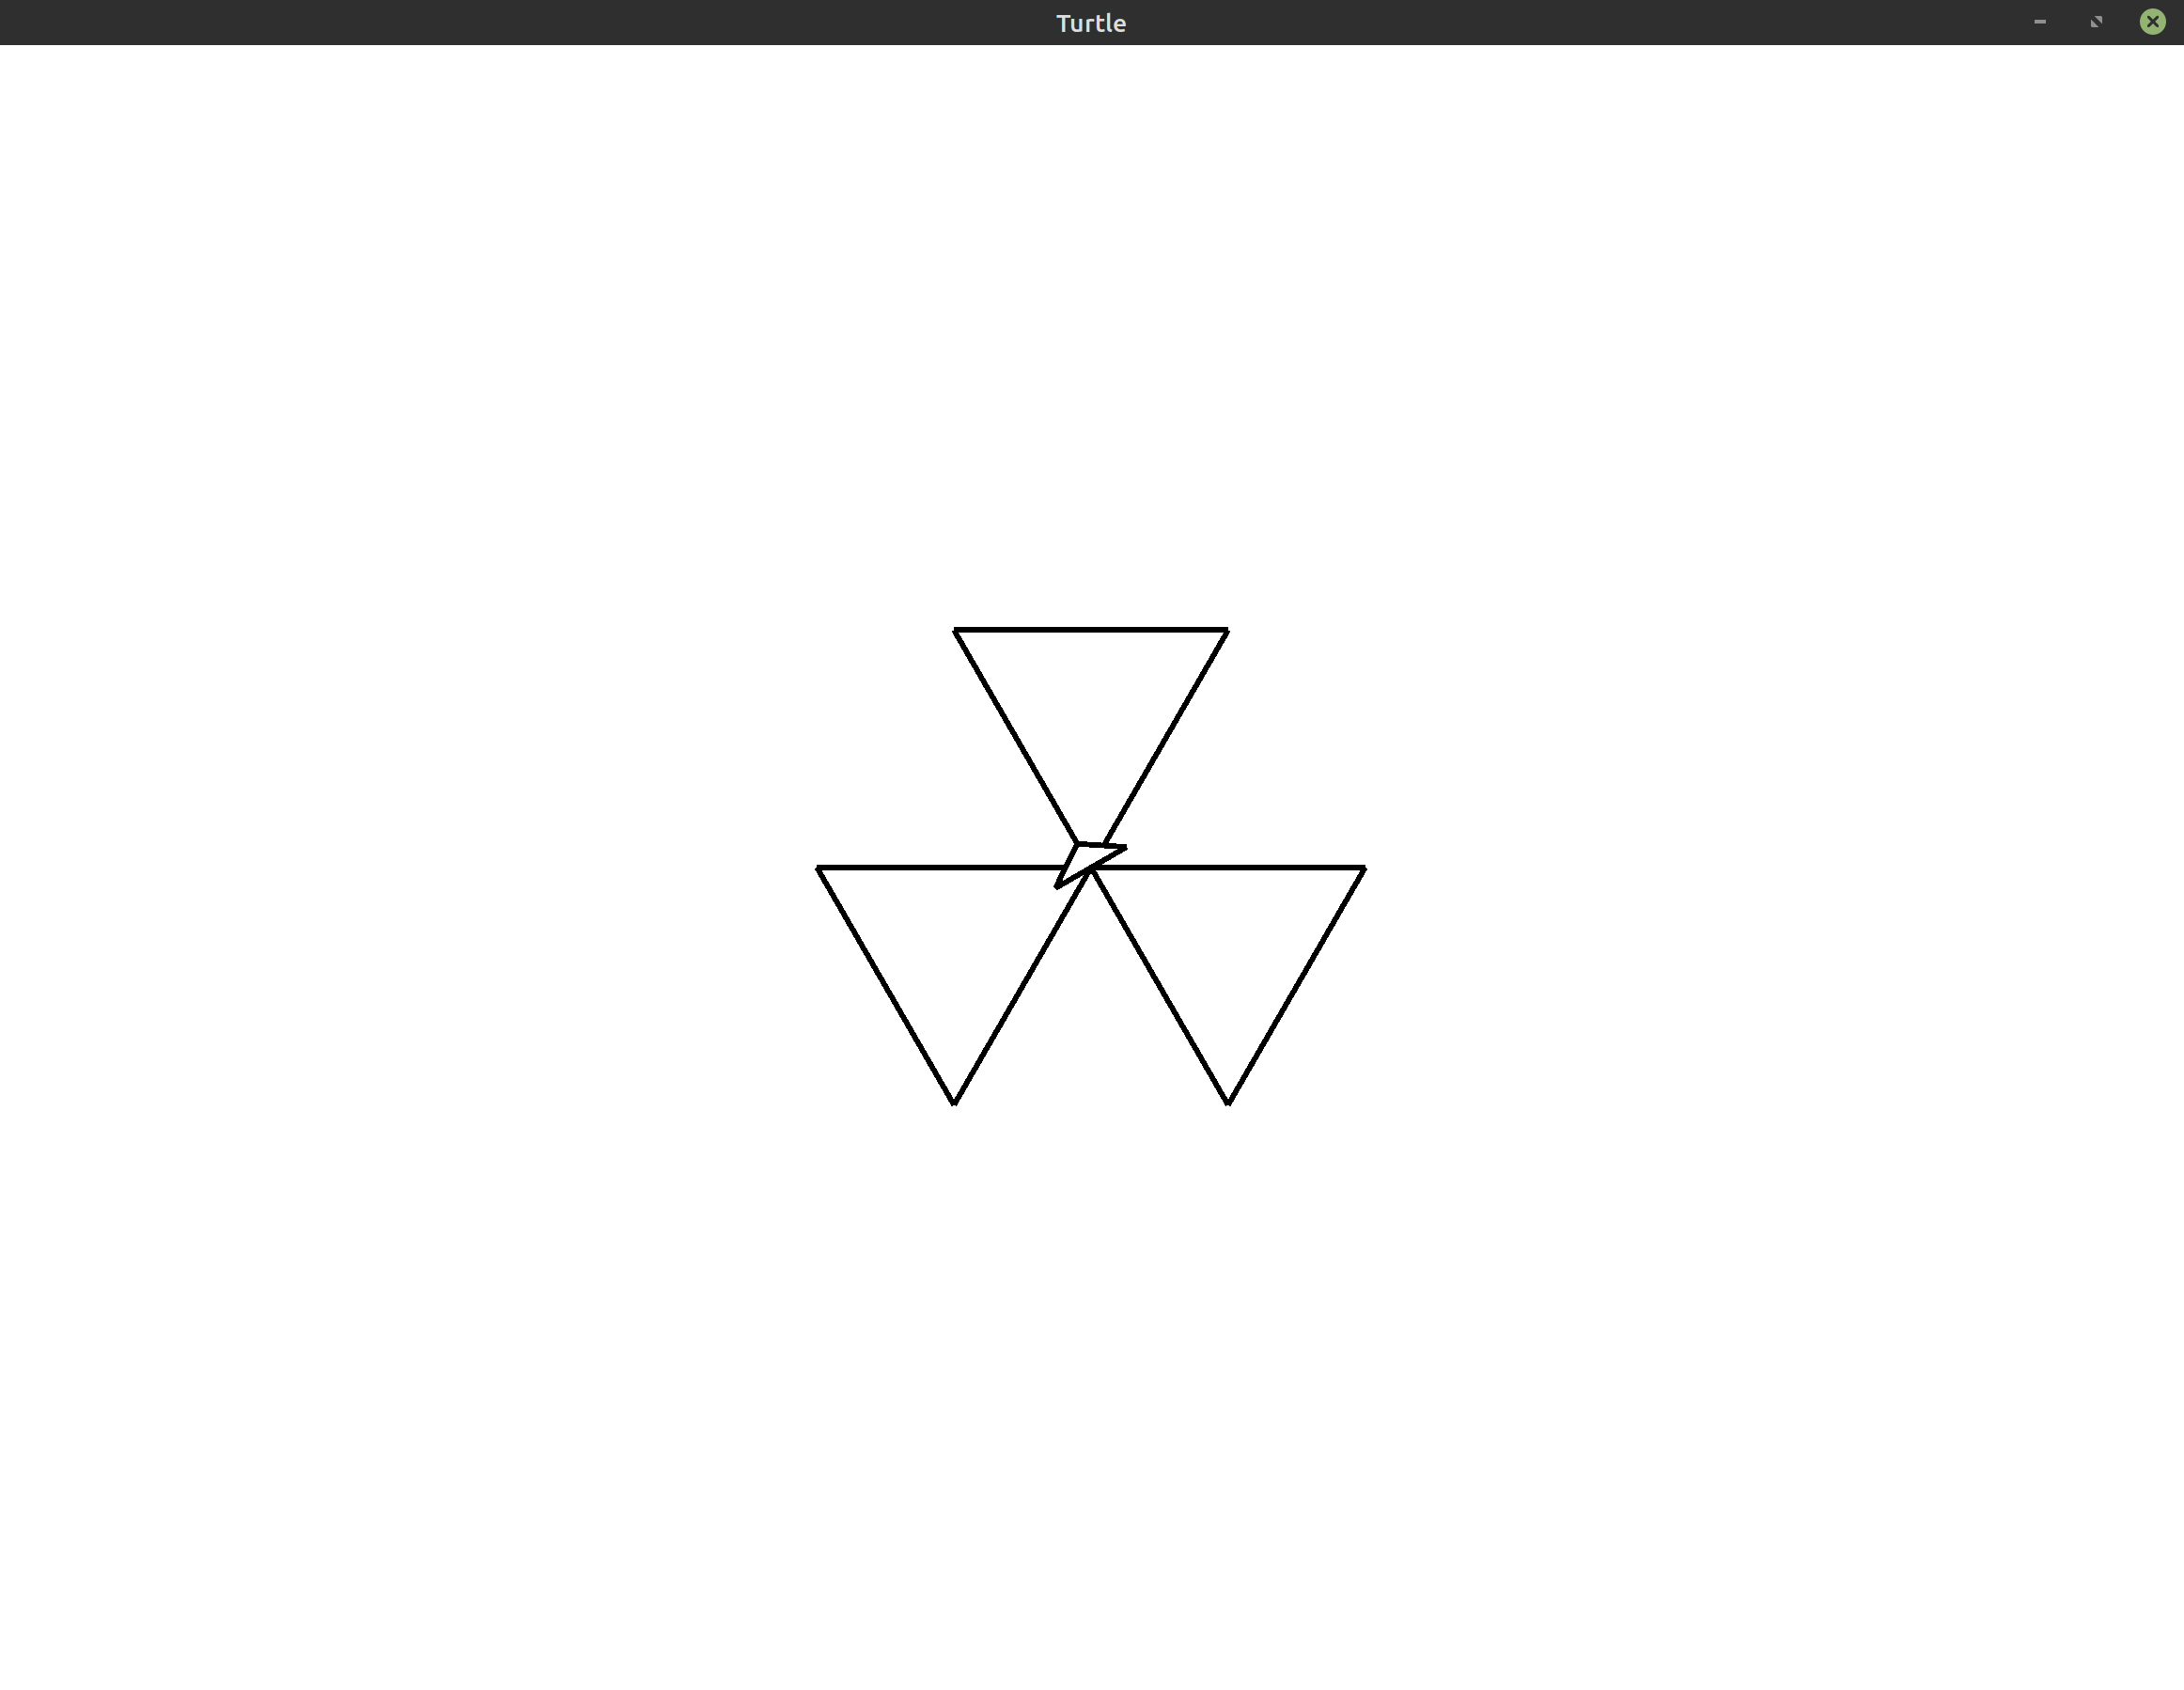
turtle.left(120.0);
}
}
Here, I’ve chosen to rotate to the left by 120°, but really you could choose any value. I used that value because it produces a nice pretty picture with the triangles evenly laid out along the center of the screen:
Now, let’s straighten things out using left again. We’ll rotate the entire
image by 30°. Notice that even though we’re changing everything in our
image, we don’t need to redo our entire program. All we have to do is call
left at the start before any of our loops. Since the turtle’s movements are
always based on its current position and orientation, the rest of the program
will adapt accordingly. No further adjustments are needed.
1
2
3
4
5
6
7
8
9
10
11
12
13
14
15
16
17
18
19
20
21
use turtle::Turtle;

fn main() {
    let mut turtle = Turtle::new();

    // Rotate the whole image by 30 degrees
    turtle.left(30.0);

    // Draw three triangles
    for _ in 0..3 {
        // Draw one triangle
        for _ in 0..3 {
            turtle.forward(100.0);
            turtle.right(120.0);
        }

        // Rotate the turtle so that the triangles
        // aren't drawn over each other
        turtle.left(120.0);
    }
}
We’ve also added some comments to help us remember what our code was supposed to do.
This gives us the following final image:
Exercises #
These exercises are designed to help you reinforce what you’ve learned throughout this lesson. All exercises are completely optional. If you get stuck on an exercise, it is totally okay to move on and come back to it later.
If you need help, see the Getting Help section of the guide.
- Exercise 1:
(*)Change the final program from this lesson to make all three triangles point up instead of down.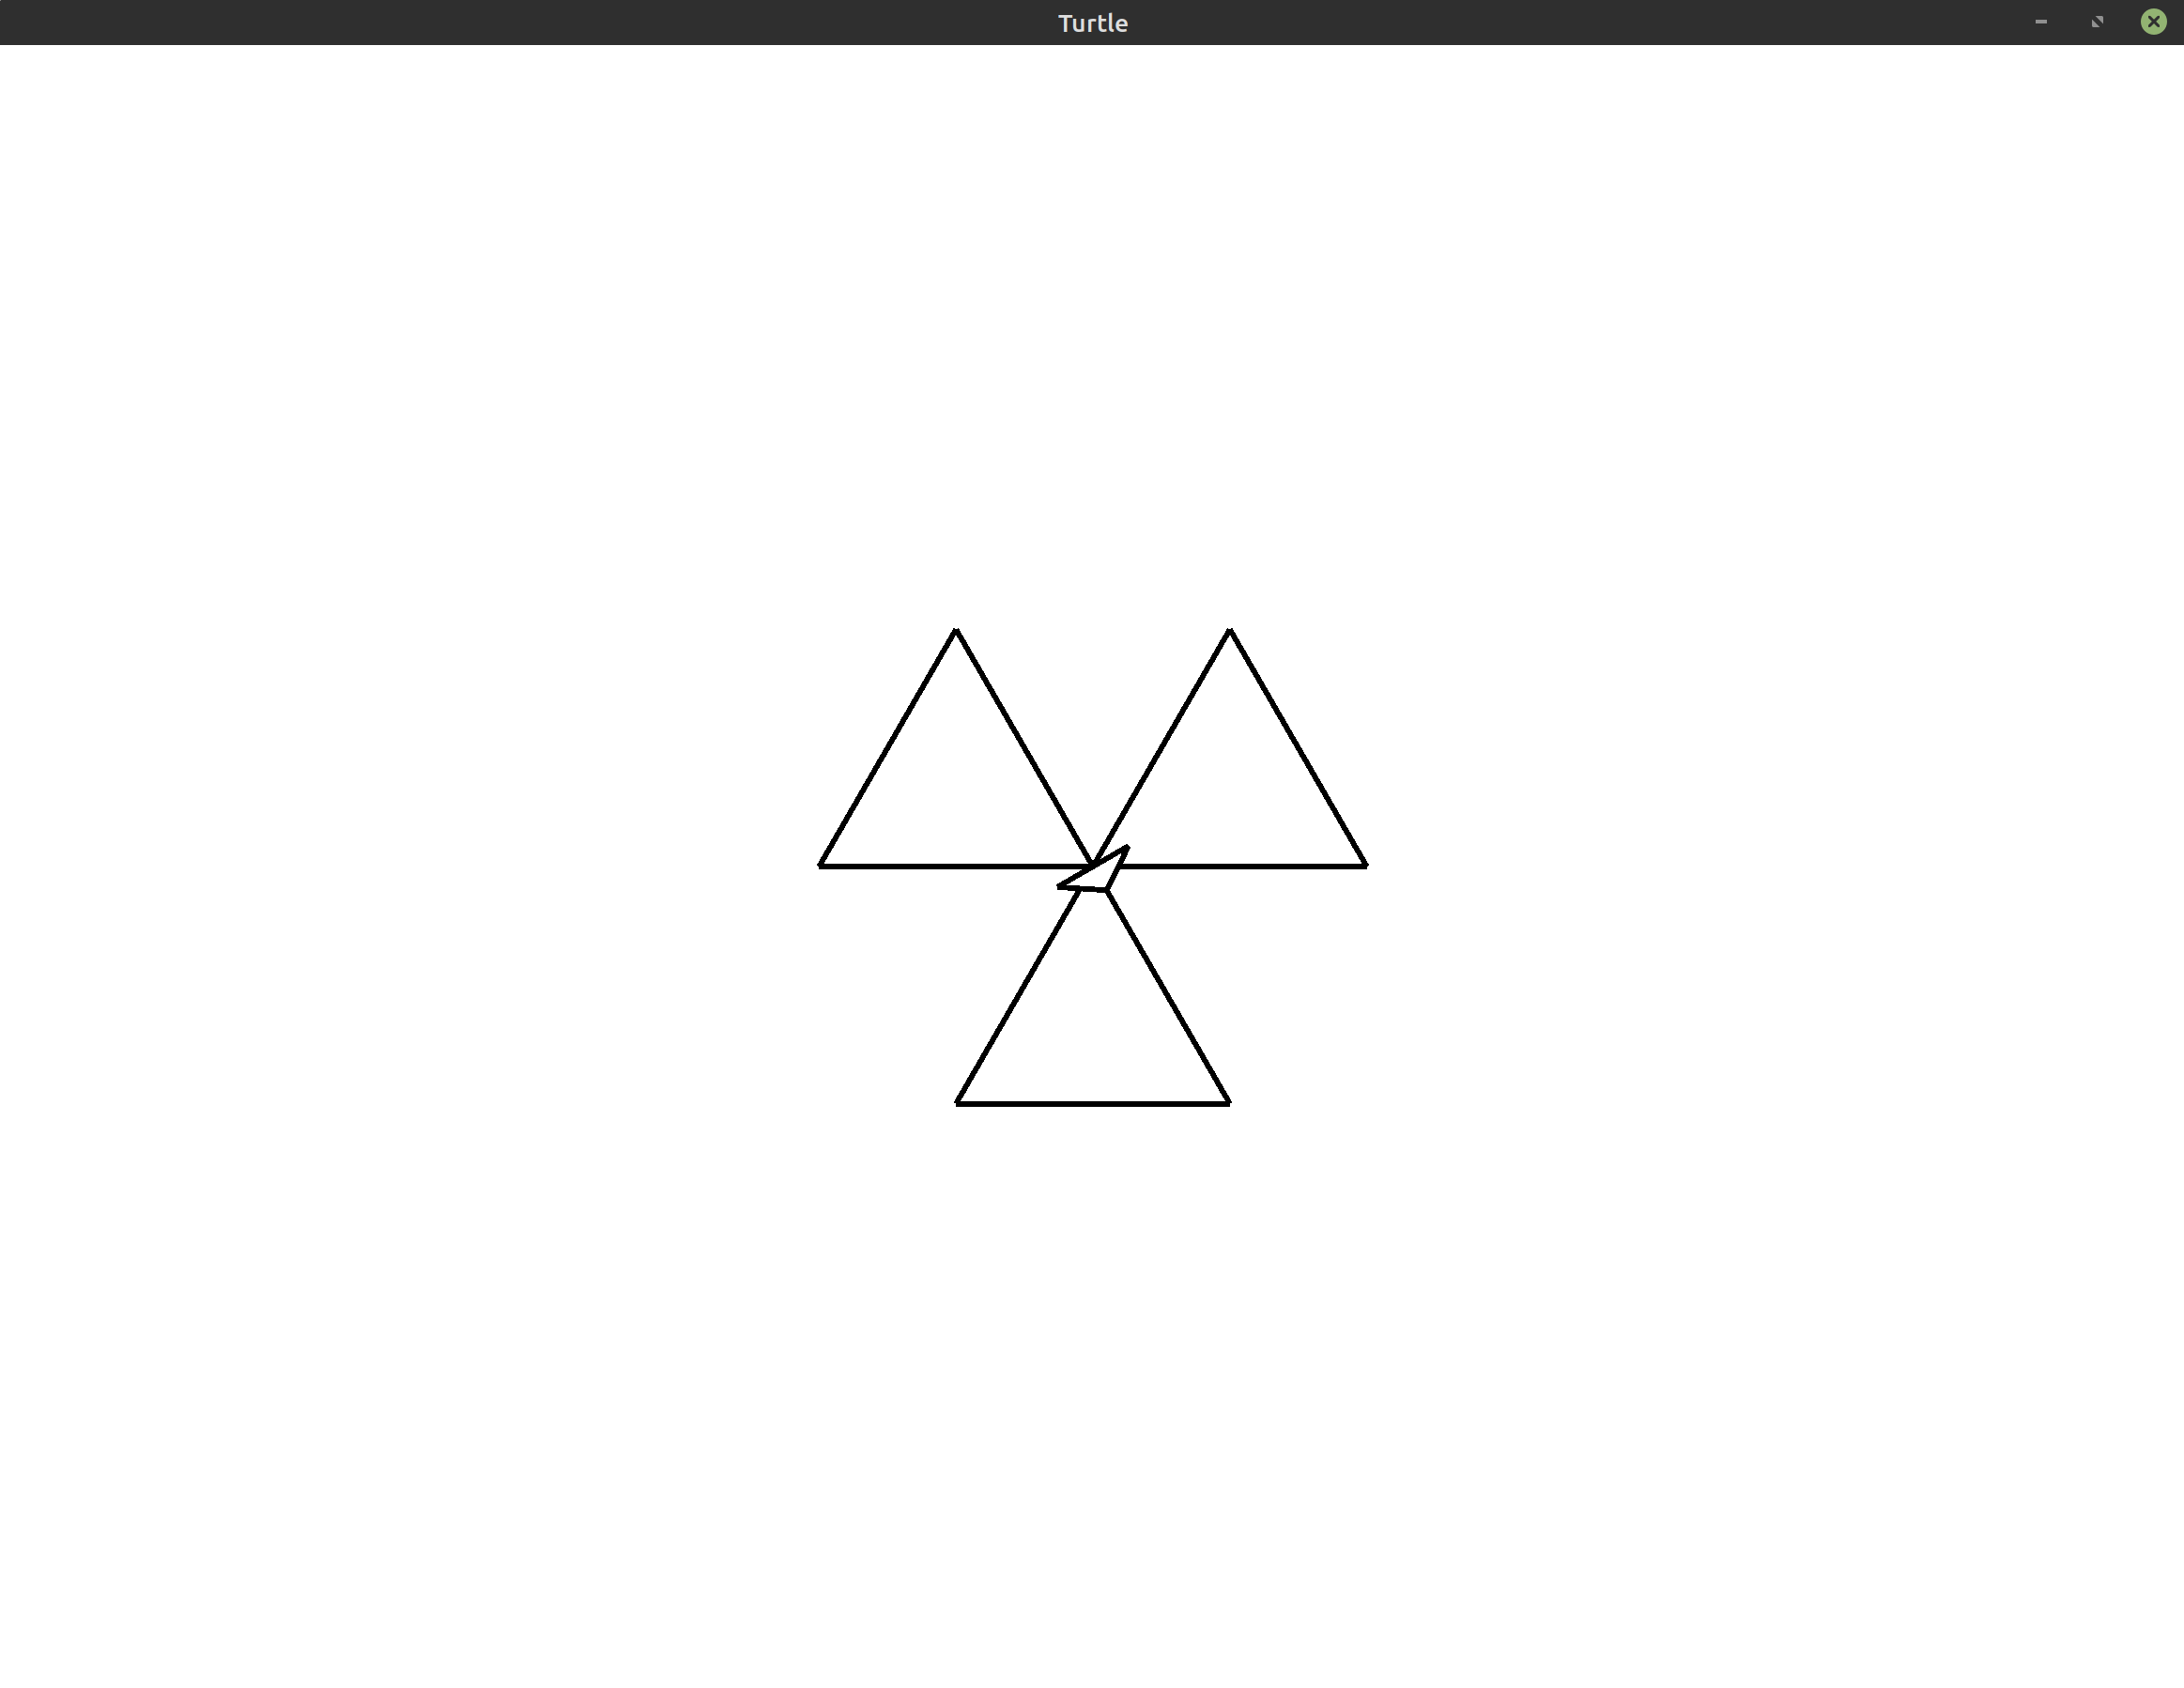 Hint: You can do this by changing just one line of the program. Note that
there is more than one way to do this exercise.
Hint: You can do this by changing just one line of the program. Note that
there is more than one way to do this exercise. - Exercise 2:
(*)Suppose you have a variable calledscaleat the top of your program. Use this variable to scale up the sides of your triangles. For example, ifscale = 2.0, your triangles should have a side length of 200 instead of 100.Show/Hide Starter Code
1
2
3
4
5
6
7
8
9
10
11
12
13
14
15
16
17
18
19
20
21
22
23
24
use turtle::Turtle;

fn main() {
    let mut turtle = Turtle::new();

    // Changes the size of the triangle's sides
    let scale = 2.0;

    // Rotate the whole image by 30 degrees
    turtle.left(30.0);

    // Draw three triangles
    for _ in 0..3 {
        // Draw one triangle
        for _ in 0..3 {
            turtle.forward(100.0);
            turtle.right(120.0);
        }

        // Rotate the turtle so that the triangles
        // aren't drawn over each other
        turtle.left(120.0);
    }
}
-
Exercise 3:
(**)So far, our program only draws equilateral triangles. Change the program so that it draws three isosceles triangles instead. An isosceles triangle is a triangle where two of the sides are the same length. For example, the image your program produces may look like the following: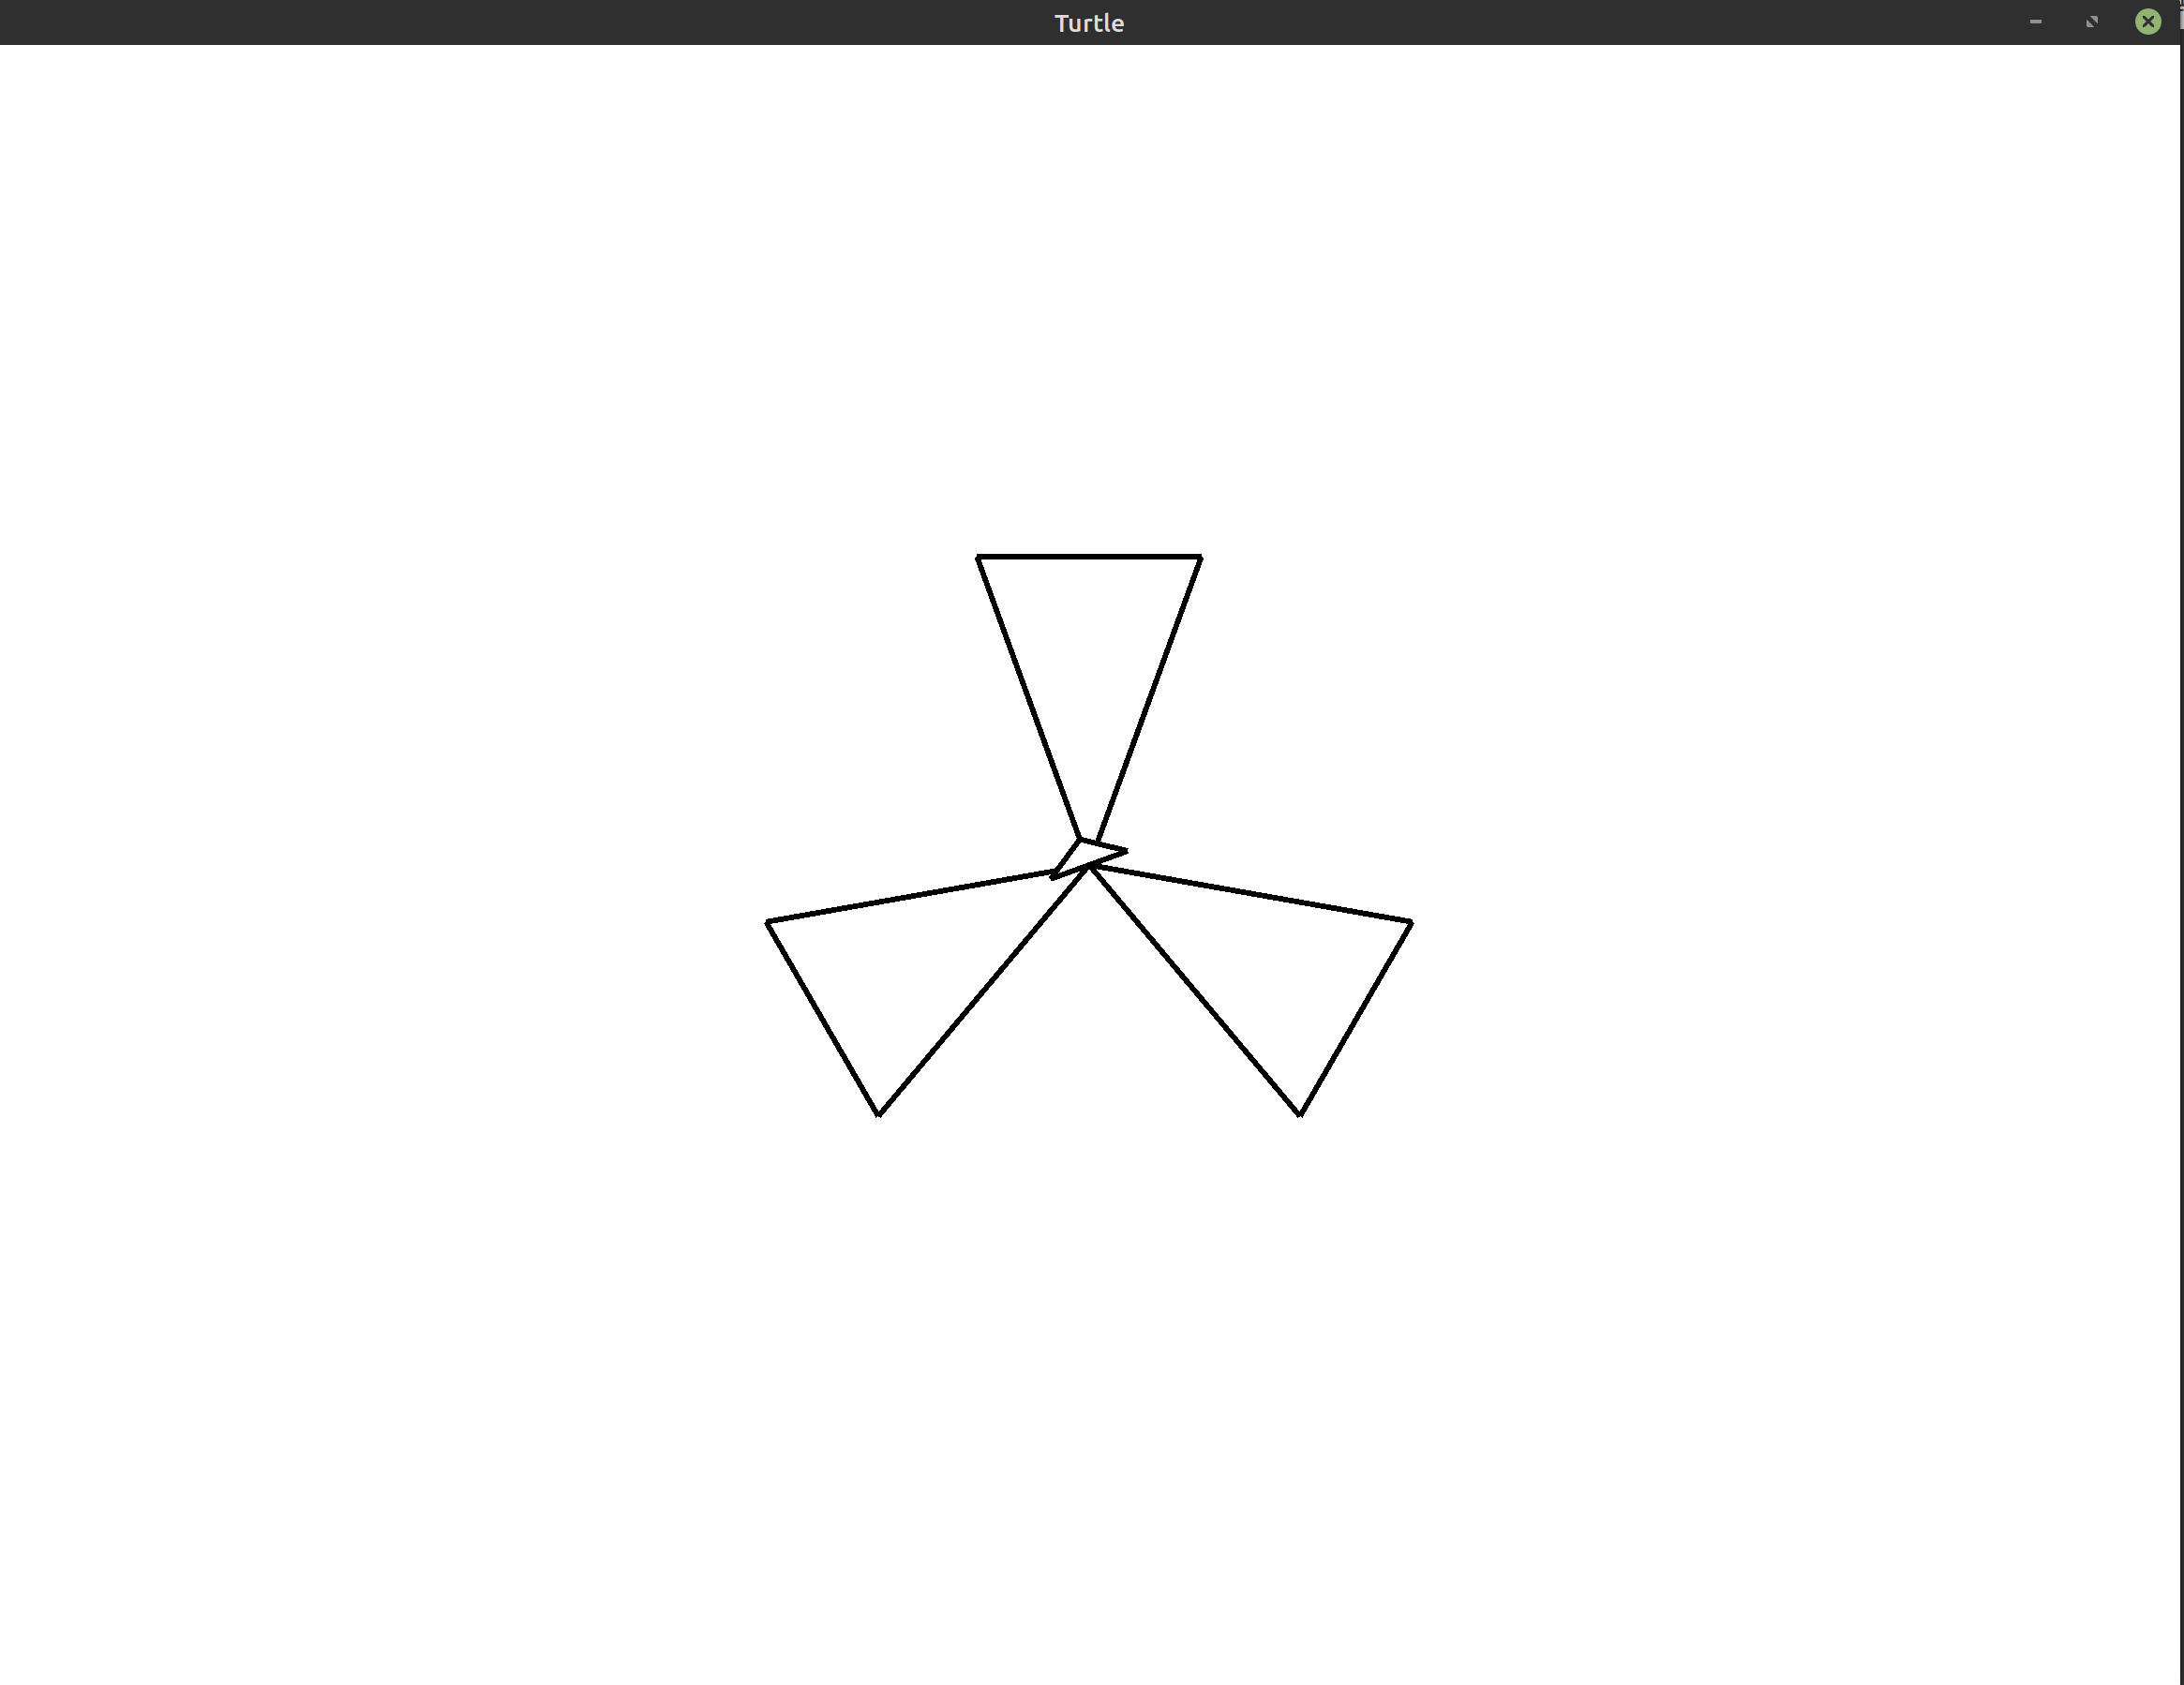 Hint: Use a triangle calculator to help you figure out the angles and
side lengths.
Hint: Use a triangle calculator to help you figure out the angles and
side lengths. - Exercise 4:
(***)Given a number of sides >= 3, draw three polygons with that number of sides. Arrange the polygons similar to how we drew the triangles above.Show/Hide Starter Code
1
2
3
4
5
6
7
8
9
10
11
12
13
14
15
16
17
18
19
20
21
22
23
24
use turtle::Turtle;

fn main() {
    let mut turtle = Turtle::new();

    // The number of sides of the polygon to draw (>= 3)
    let sides = 3;

    // Rotate the whole image by 30 degrees
    turtle.left(30.0);

    // Draw three triangles
    for _ in 0..3 {
        // Draw one triangle
        for _ in 0..3 {
            turtle.forward(100.0);
            turtle.right(120.0);
        }

        // Rotate the turtle so that the triangles
        // aren't drawn over each other
        turtle.left(120.0);
    }
}
Here’s an example of how the output might look with squares (
sides = 4):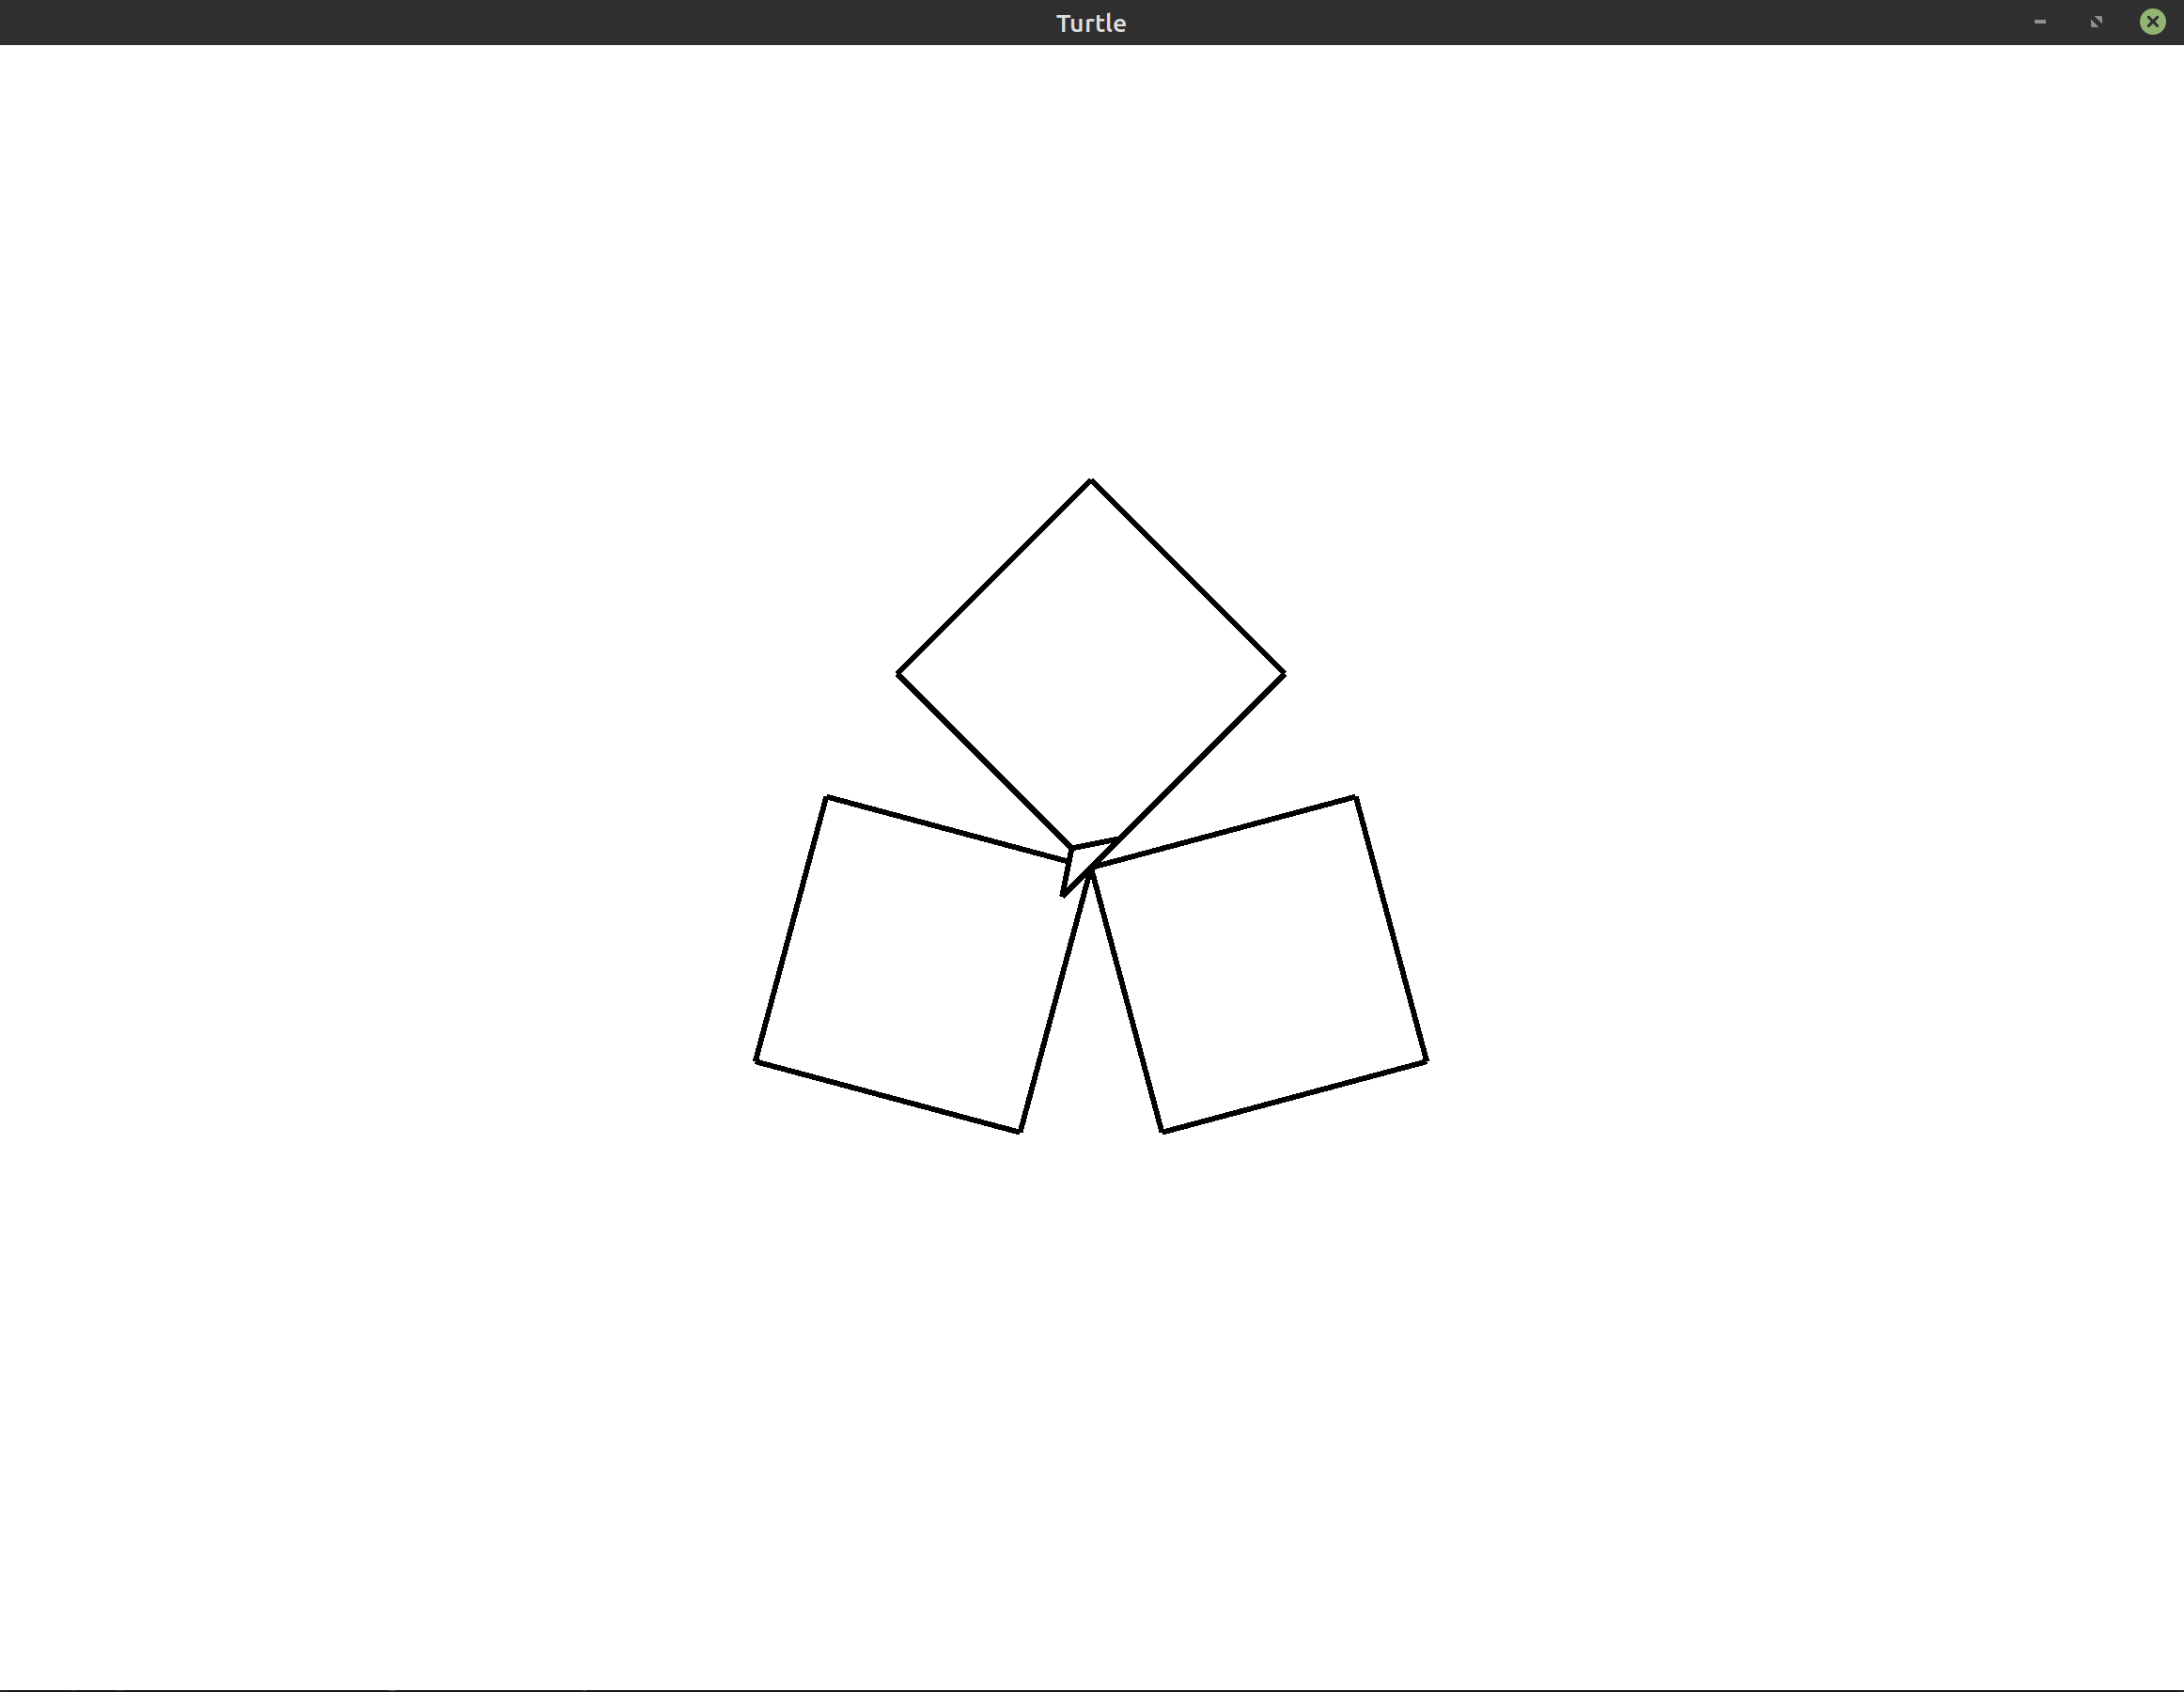 Hint: Example: Polygons covers one possible solution to this
problem. The program there is even more general than what this exercise asks
you to create. If you get stuck, you may want to move on and attempt this
later.
Hint: Example: Polygons covers one possible solution to this
problem. The program there is even more general than what this exercise asks
you to create. If you get stuck, you may want to move on and attempt this
later.